
Our new energy monitor
The setup
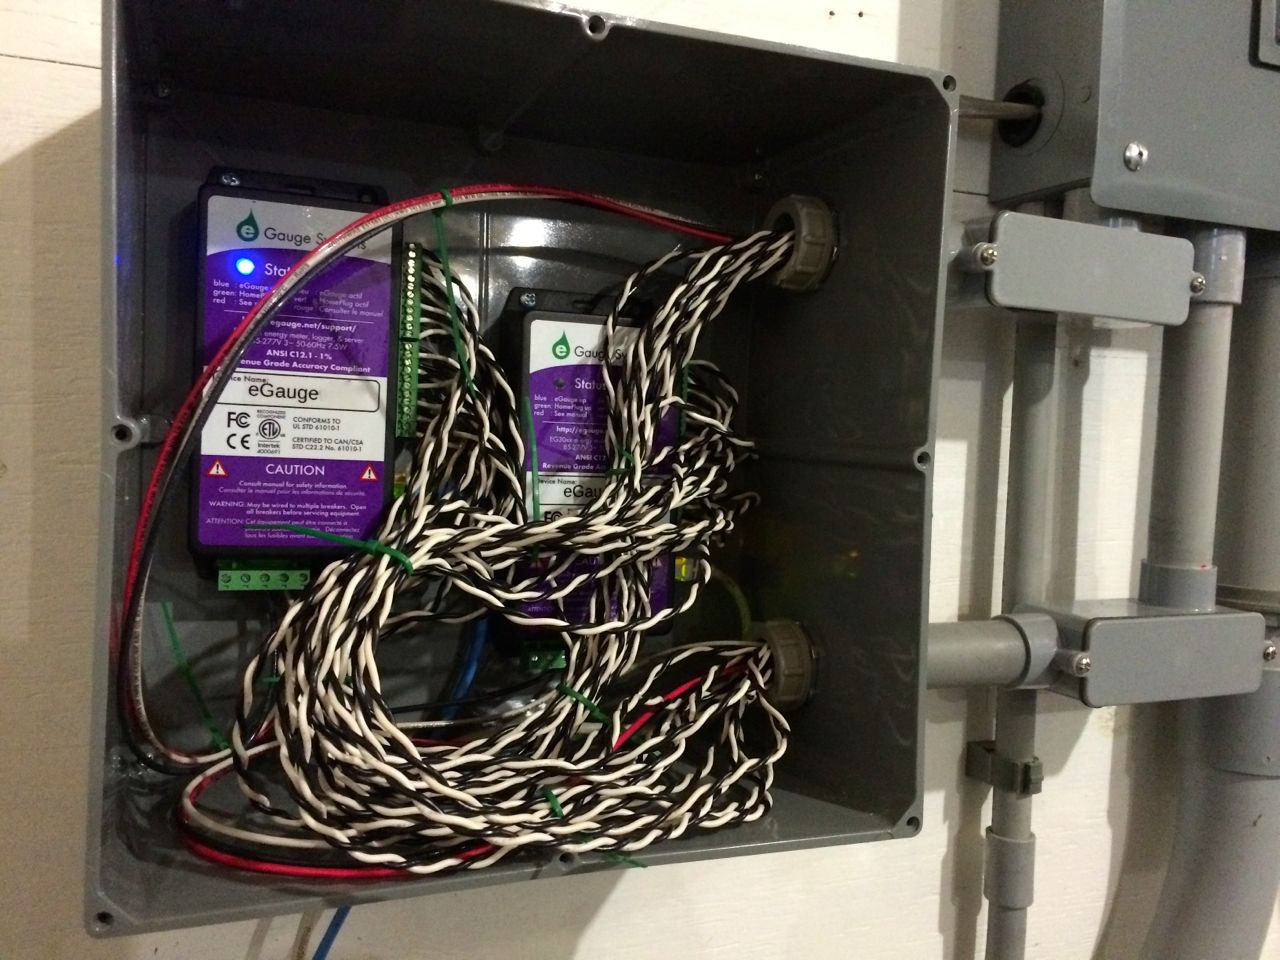
As you can see in the photo above, we have 2 new eGauges. Each monitors up to 12 circuits, for a total of 24. When you count 2 lines in, solar and several circuits that have double breakers pulling unbalanced loads, that ends up covering 20 individual things we can now monitor. We were previously monitoring only 7 circuits plus solar and power from the utility.
We’re now monitoring the kitchen refrigerator, basement freezer, ventilator, ventilator pre-heat, barn, the backup electric resistance units in the bedrooms and living room, and a bunch of other circuits including the one we charge our plug-in hybrid.
We chose the EG3000 model without the HomePlug AV. Our router is very near the electric panel in the basement so it was easy to wire it directly using ethernet cables. The ethernet model requires a separate enclosure. You can’t put it in the panel box. This is fine because there is isn’t much room in the panel box, especially after you install 24 CTs and a load of twisted spaghetti wire (see above). My electrician installed this small box next to the panel with all the wires running through conduits. I’m going to cut a piece of clear plexi to fit over the box so you can still see everything inside, but keep the dust out.
The install
The eGauge install was fairly similar to the eMonitor. You need to power the monitor devices directly from the breakers in the panel box, and you need to keep track of which lines you are monitoring. My electrician figured it quite easily, although he installed all the current transformers (CTs) in the opposite direction. Thankfully this doesn’t really matter as long as you are consistent in the direction you install them.
The cost
The 2 eGauge units plus the CTs and shipping worked out to $1,282. Our electrician charged us about $400 for the physical install. I did the configuration and spent several hours messing with the settings to get everything working correctly. The documentation is not great, but I figured most of it out. Having some prior experience with an energy monitor (we’re now on our third) definitely helped.
I don’t remember how much we paid for the eMonitor 2 years ago. I seem to recall in the $600 range for the 12 circuit wifi model, plus another $400 for install. It looks like you can now get a 24 circuit ethernet connected model for $700 plus the 2 year subscription fee, which for us was about $180.
So why did we switch?
1. No yearly licensing cost
I absolutely enjoyed the data that came out of our eMonitor (see our post 2 years ago), but I deplored their architecture and business model which required me to pay a subscription fee every two years to have access to my data on their servers.
eGauge has no licensing fees and stores its data right on the box, at 1 minutes resolution for the first year and 15 minute resolution after that up to 30 years.
2. Data quality
I’ve been tinkering with some new analysis techniques that required minute resolution data. So I downloaded 2 years worth of minute data from my eMonitor. This was not a pleasant experience since they only allow you to download 2 weeks of data at a time, the data files are large. Then I proceeded to look at the data and try to recreate the hourly data from the minute data. This should be an easy exercise, but I found that there were lots of little gaps in the data. I was not able to fully recreate the hourly data I had originally downloaded. After numerous emails with their service desk, they stopped responding. I don’t think they could explain the gaps. I don’t know if the problem was hardware, or data was lost in translation, but it didn’t give me a lot of confidence in the device or service.
I spoke about this issue with a few people at the Better Building by Design conference in Burlington, VT back in February. The Efficiency Vermont booth was demonstrating some energy monitoring case studies and had good things to say about the eGauge. I have a huge amount of respect for the Efficiency Vermont organization. Lots of smart folks there.
3. Make-ability
I enjoy building stuff and tinkering with different ways of analyzing and visualizing our energy usage.
With the eMonitor, I downloaded our data from their servers once a month. It wasn’t easy enough to do in any shorter increments and I wasn’t going to apply for a developer license to access their databases directly.
Since the eGauge data is on the box in my basement*, I can access realtime data through the built in web interface or through a simple API. This is awesome for makers. I’m looking forward to building a new realtime interface to view our energy data.
*Since the data is on the box in my basement, I’m setting up an automatic backup.
4. Customizable
the eMonitor may be different now, but when I bought it 2 years ago, it came as a kit to monitor several different sized loads. We ended up not using one of the monitoring slots because we didn’t have a circuit I wanted to measure that matched the monitor amperage.
eGauge lets you mix and match components. I picked the number and size of the CTs and the type of monitor configuration to match my setup.
That’s it, go out there and measure stuff.
Categories
- Air sealing 13
- Appliances & Fixtures 4
- Art 3
- Award 4
- Bathroom 8
- Batteries 1
- Decor 5
- Design 10
- Electrical 5
- Energy Calculations 13
- Energy Monitors 4
- Farm 1
- Finance 1
- Flooring 3
- Foundation 9
- Framing 8
- Heating 9
- House 7
- Insulation 8
- Kitchen 6
- Landscaping 3
- Lessons Learned 1
- Performance 60
- Plumbing 10
- Porch 5
- Radon 1
- Rainwater catchment 3
- Research / study 1
- Roof 7
- Septic / Waste water 2
- Sheetrock 6
- Siding 9
- Site Work 22
- Smart home 1
- Solar 64
- Solar Obsessed 10
- Stairs 2
- Surveying 3
- Ventilation 8
- Weather 1
- Windows & Doors 14
- plug-in 3
Archive
- Jan 2021 1
- Dec 2020 2
- May 2020 1
- Jan 2020 1
- May 2019 1
- Jan 2019 3
- Sep 2018 2
- Aug 2018 2
- Jan 2018 1
- Oct 2017 2
- Apr 2017 1
- Jan 2017 1
- Oct 2016 2
- Aug 2016 1
- Apr 2016 2
- Jan 2016 2
- Nov 2015 2
- Oct 2015 1
- Jul 2015 1
- May 2015 1
- Apr 2015 1
- Jan 2015 1
- Dec 2014 1
- Nov 2014 2
- Oct 2014 4
- Sep 2014 2
- Aug 2014 1
- Jul 2014 1
- Mar 2014 3
- Feb 2014 2
- Jan 2014 2
- Nov 2013 1
- Oct 2013 1
- Sep 2013 1
- Jul 2013 3
- Apr 2013 3
- Jan 2013 3
- Dec 2012 2
- Nov 2012 3
- Oct 2012 1
- Sep 2012 3
- Aug 2012 3
- Jul 2012 2
- Jun 2012 1
- May 2012 3
- Apr 2012 2
- Mar 2012 4
- Feb 2012 4
- Jan 2012 5
- Dec 2011 4
- Nov 2011 9
- Oct 2011 10
- Sep 2011 9
- Aug 2011 6
- Jul 2011 6
- Jun 2011 12
- May 2011 8
- Apr 2011 4
- Mar 2011 5
- Jan 2011 6
- Dec 2010 9
- Nov 2010 3
- Oct 2010 4
- Sep 2010 6
- Aug 2010 8
- Jul 2010 6
- Jun 2010 3
- May 2010 3
- Apr 2010 1
- Mar 2010 3
- Feb 2010 3
- Dec 2009 1
- Jun 2009 1
- May 2009 1
- Feb 2009 1
- Dec 2008 1
- Nov 2008 1
- Jun 2008 1